

Showing posts with label cake. Show all posts
Showing posts with label cake. Show all posts
Monday, March 16, 2026
Monday, January 12, 2026

Monday, September 26, 2022
Carrot Pineapple Cake and Small Chicken Divan

I can't say that it's too much cooler yet, with temperatures still in the 90's, but hopefully soon!

Monday, March 21, 2022

Monday, March 14, 2022
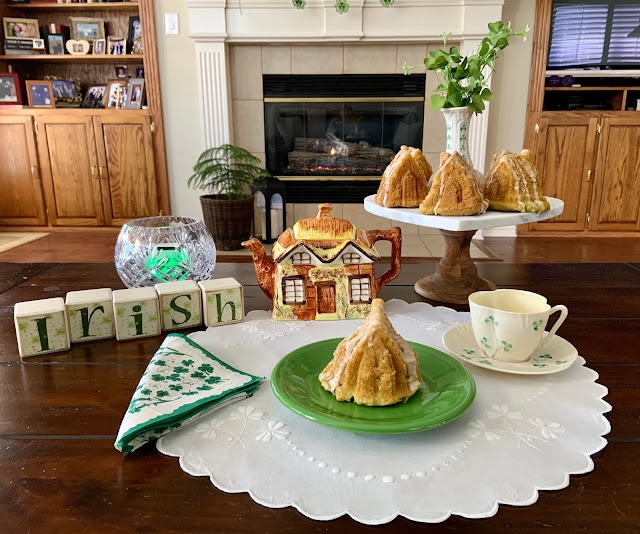
Monday, December 13, 2021
Buche de Noel
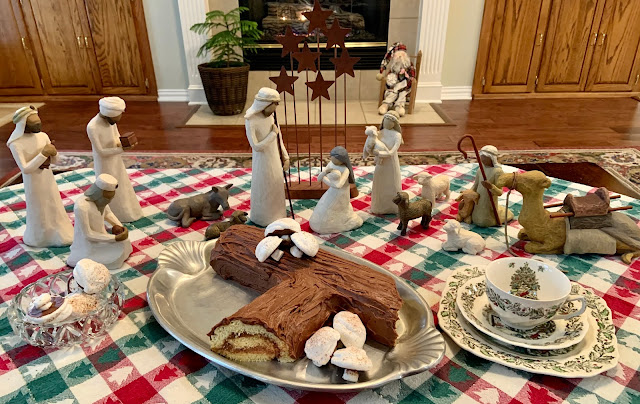
Happy Third Week of Advent! I went to a luncheon the other day and made a Buche de Noel with Meringue Mushrooms.
Monday, June 21, 2021
Sponge Cake

Is anyone in the mood for Strawberry Shortcake? Although I would never turn down a piece, in all actuality, I prefer a sponge cake or even an angel food cake for my strawberries.
Monday, March 8, 2021
Irish Apple Cake

In anticipation of St. Patrick's Day, I've prepared us an Irish Apple Cake that I've been wanting to make, that comes from Mary's blog Home Is Where The Boat Is. My quilt topper was made years ago, and it's fun to pull out for St. Paddy's Day. My new heart shaped cake stand is a birthday gift from my forever friend, Joy, who knows me so well.

My late beloved mom gave me these kissing leprechauns years ago. She always thought of my hubby and I.

This Johnson Brothers teacup called Roland is a beautiful vintage pattern.

This thrifted teapot was made in Cork County, Ireland, where my great grandmother, Hannah, was born.

Another memento is this pair of candle holders that my mom gave me, that belonged to my maternal grandmother. I love family treasures!

Let's have a cup of Irish Breakfast tea and a slice of cake together, shall we?

I had a birthday celebration with these two granddaughters and my son, Tim, and DIL, Julie.

I celebrated with the rest of my family, Molly and Eric, Kristen and Kevin, and the rest of my grandchildren, except for Connor, who's in the Marines.
Yield: 1- 9" springform cake or 1 -7" springform cake and 3 mini loaves

Irish Apple Cake
Ingredients
- Cake
- 2 large cooking apples, such as Granny Smith
- 1 1/3 cups all-purpose flour
- 2 teaspoons baking powder
- 1 teaspoon ground cinnamon (the next time I'm going to add a little bit of cloves)
- 1/2 teaspoon salt
- 1/2 cup (1 stick) butter, softened
- 1/2 cup superfine sugar (or same amount of granulated sugar processed in a food processor for 1 minute)
- 2 eggs (I use room temperature eggs or put the uncracked eggs into a bowl of warm-hot water for 5 minutes)
- 1-2 tablespoons milk
- confectioners’ sugar for dusting
- Streusel:
- 1 cup flour
- 1/2 teaspoon cinnamon (Mary's suggestion)
- 6 tablespoons butter
- 1/2 cup superfine sugar
Instructions
- Preheat oven to 350 degrees and spray a 9- inch round springform pan with cooking spray.
- To make the streusel topping, sift flour and cinnamon into a bowl (I use a whisk instead of sifting) and cut in butter with a pastry blender until mixture resembles crumbs. Stir in sugar and put aside.
- Peel, core, and thinly slice apples (I used my apple-peeler-correr-slicer). Set the apples aside.
- To make the cake, sift the flour into a bowl with the baking powder, cinnamon and salt. Place the butter and superfine sugar in a separate bowl and beat together until light and fluffy. I used my mixer for this. Gradually beat in eggs, adding a little flour mixture with the last addition of egg. Gently fold in half of the remaining flour mixture, then fold in the rest with the milk.
- Spoon the batter into the prepared pan and smooth the top (an off set spatula works great for this this batter). Cover with the sliced apples and sprinkle the streusel topping evenly over the top. Bake for 1 hour or until browned and firm to the touch. Let cool in pan before removing the sides. Dust cake with confectioners’ sugar before serving.
- Best served warm from the oven or reheated in the microwave.
Notes:
Vanilla ice cream or whipped cream is a nice accompaniment.
I baked the mini loaves for 45 minutes and the 7" cake for 50 minutes.
Thank you for your visit! xo

I am sharing this with these lovely parties:

Monday, November 9, 2020
Pumpkin Roll
 |
Oh happy day, we've had some beautiful weather and sunny skies, so off to the patio I went for my tea party. Do you love pumpkin roll? I think I may like it better than pumpkin pie. Hmmmm...could it be the cream cheese filling that I like so much?? My big star quilt that I made always come out in the Fall because it has pumpkin vines as one of the patterns.

This teapot is perfect for November with all the Fall bounty and the wheat handle.

Here's the backside, which is just as pretty as the front. I found this several years ago for a a few dollars at a thrift store in Ohio.

This Lenox Weatherly teacup came from the first teacup exchange that I participated in and it goes with anything.

My mountain bike loving and rock climbing granddaughter turned 6 this past week! That is Harper after riding 6 miles by herself, with her daddy running behind her.

Connor, my Marine grandson, turned 20!! How can those years fly by so quickly?? He was home on a surprise visit back in September.
Yield: 8-10

Pumpkin Roll
I have been making this recipe for years, and it's a very good one. My family loves it.
Ingredients
- For the cake:
- 3 eggs
- 3/4 cup sugar
- 1/4 cup firmly packed brown sugar
- 1 cup pumpkin ( I always freeze the rest of the pumpkin for another recipe)
- 1 cup flour
- 1 teaspoon baking powder
- 1/2 teaspoon salt
- 1 teaspoon pumpkin pie spice
- 1 teaspoon cinnamon
- 1/4 teaspoon nutmeg
- 1 cup finely chopped pecans
- 2 tablespoons powdered sugar
- For the Filling:
- 1 (8-ounce) pkg. cream cheese, softened
- 1/4 cup butter, softened
- 1 and 1/4 cup powdered sugar
- 1 teaspoon vanilla
Instructions
For the Cake:
- Preheat oven to 375 degrees.
- Grease an 15" x 10" jelly roll pan. Line with wax paper or parchment paper, and grease and flour that (I use a spray that contains flour.)
- Combine eggs, and both sugars and beat on high speed of an electric mixer until smooth. Add pumpkin, mixing well.
- Combine the flour, baking powder, salt and spices, stirring well; add to pumpkin mixture and mix until smooth.
- Pour the batter into the prepared pan, and spread evenly, then sprinkle with pecans. Bake for 12-15 minutes, or until top of cake springs back when touched.
- Sprinkle 2 tablespoons of powdered sugar evenly onto a tea towel. Loosen edges of cake and carefully invert onto towel. Remove the wax or parchment paper. Roll up cake in towel, beginning with short side. Cool cake completely on a cooling rack
- Combine the butter and cream cheese in a medium bowl, and beat with and electric mixer until smooth. Add the powdered sugar and the vanilla and beat again until smooth.
- Carefully unroll cake and spread with cream cheese filling to within 1/2" of edges. Carefully reroll cake without the towel. Place on a serving platter; chill before serving.
Notes:
Often the cake cracks, but if you wish, you can cover the crack on top with some whipped cream.
Thank you for your visit! xo

I am sharing this with:
Keep In Touch
Full Plate
All About Home with Debra
All About Home with Amber
Love Your Creativity Link Party
Meal Plan Monday
Monday, April 6, 2020
Carrot Bunny Cakes

I'm taking a break from making Covid-19 masks, and enjoying a bunny cakelet and a cup of tea. Would you like to join me? I have several bunnies that you can enjoy. You may wonder why I have a fire going in Texas, in April. Well, it's because it's been so chilly!!

This pretty teacup always reminds me of Spring and of Lauren from My Wonderfully Made Blog who gifted it to me, from Stephanie's teacup exchange awhile back.

My daughter sculpted these carrots when she was in middle school. Don't they looks real??!! Aren't they beautiful? I think she should've been a sculptor!

Here are some more bunnies hopping on the plate ready for us to catch and eat!

These are some of the masks that I made for the staff of a memory care facility, that my friend Patty requested. I'm so thankful that I keep my scraps of fabric, and they brought back many memories of things that I made, and who they were for. I used a pattern from Craft Passion. Elastic is getting so scarce, but I guess there are other alternatives that you can find. Another of my friend's suggested to use flannel for the lining to keep it soft against the face.

My friend, Patty, was so grateful that I made the masks, and surprised me with a bag of gifts that she left on my porch. In it was a Palm Cross, a book that she loved, a candle, and a homemade loaf of her chocolate-y chocolate chip zucchini bread. Wasn't that so kind of her? There are so many thoughtful people in this world.
Stay well and stay safe, and God Bless You!
Yield: 8-10 bunnies, or you could make cupcakes

Carrot Bunny Cakelets
My youngest son and daughter-in-law gave me a gift card to Sur La Table for my birthday, and the bunny cakelet pan was one of the items I purchased.
Ingredients:
- 1 2/3 cups all purpose flour
- 1/2 cup granulated sugar
- 1/2 cup light brown sugar
- 1 tsp kosher salt
- 3/4 tsp baking powder
- 1/2 tsp baking soda
- 2 tsp cinnamon
- 1/4 tsp allspice
- 1 tsp nutmeg
- 1 1/2 cups finely shredded carrots
- 1/3 c vegetable oil
- 1/4 c unsalted butter, softened
- 1/3 c sour cream
- 2 eggs
- 1 1/2 tsp vanilla extract
- 1/4 cup finely chopped walnuts (optional)
- Frosting:
- 1/4 cup softened cream cheese
- 1/4 cup softened butter
- 1 1/2 cups powdered sugar
- 2 Tbsp milk
- 1 tsp vanilla extract
Instructions:
How to cook Carrot Bunny Cakelets
- Heat oven to 350°F.
- Prepare your pan by greasing and flouring or by using a baking spray containing flour.
- Combine all dry ingredients in a bowl, and toss with shredded carrots to combine and coat.
- Combine oil, butter, sour cream, eggs and vanilla in bowl; beat until combined thoroughly, scraping down the sides of the bowl occasionally.
- Add wet mixture to flour mixture; stir by hand until combined. Stir in walnuts, if using. Pour into pan. Bake 25-30 minutes or until toothpick inserted in center comes out clean. Cool in pan 5-10 minutes before removing cakes.
- For frosting, combine cream cheese and butter and microwave until very soft and melted, 10-20 seconds. Stir to combine. Add in vanilla and powdered sugar, stirring until smooth and combined. Use milk to thin the glaze to a desired consistency for coating the cakes. Coat each cake. I decided to pipe the frosting on the tails of the bunny, and left the frosting thick. Serve immediately, or refrigerate until serving.
- Bakes 8-10 bunny cakelets or one large Bundt cake.
I am sharing with these lovely parties:
Monday, December 30, 2019
Instant Pot Chocolate Cake

I hope that all of you had a wonderful Christmas! I'm relaxing and having a slice of this rich cake and a cup of tea from my new poinsettia teacup that my darling daughter gave me, which also has a matching pitcher.

Isn't the teacup a pretty one? Red is my favorite color, too! I'm having some Candy Cane Lane tea today, which goes nicely with the cake.

My son, Mike, who lives with me, has a New Year 's Eve birthday, and I thought I'd try the cake out to see how it tastes. it was my first time baking a cake. I like that the 6-cup bundt pan makes for a smaller size cake.
Yield: Depends on how big you slice

Instant Pot Chocolate Cake
This cake is very chocolate-y and dense!
ingredients:
- 1/3 cup unsweetened cocoa powder
- 3/4 cup hot water
- 1 and 1/4 cup sugar
- 1 teaspoon kosher salt
- 1 and 1/4 teaspoon baking soda
- 2 large eggs
- 1/2 cup sour cream
- 1/2 cup vegetable oil
- 1 and 1/2 teaspoon vanilla
- 1 and 1/3 cup flour
- 3/4 cup mini semi-sweet chocolate chips
- For the ganache
- 1/4 cup semi-sweet chocolate chips
- 1/4 cup heavy whipping cream
instructions:
How to cook Instant Pot Chocolate Cake
- In a small bowl combine hot water with cocoa powder. Whisk until smooth and set aside.
- In a large mixing bowl, combine sugar, baking soda, kosher salt, and eggs. Add in sour cream, vegetable oil, and vanilla extract.
- Whisk until smooth. Stir in flour until fully combined. Add cocoa mixture and beat for 2 minutes, scraping down sides of the bowl as needed. Fold in chocolate chips.
- Pour batter into a 6 cup bundt pan, that has been greased very thoroughly with baking spray.
- In the bottom of the Instant Pot add 1 1/2 cups of water. Put the bundt pan on a trivet with handles (and for easier lifting, you can make a sling out of foil if your handles are not long enough) and lower into the pressure cooker.
- Secure the lid and turn the valve to "SEALING."
- Select "HIGH PRESSURE" for a cook time of 32 minutes.
- When cook time ends, allow to naturally release for ten minutes, then do a quick release and remove the cake pan from the pressure cooker.
- Allow cake to cool in pan for about 5 minutes, then invert onto a cake plate.
- For the ganache, add chocolate chips and heavy whipping cream to a glass bowl. Heat for 30 second intervals in microwave stirring between each interval. Let the ganache set to thicken before spreading on top of the cooled cake.
NOTES:
Decorate the cake with sprinkles, or even leave off the ganache and sprinkle with powdered sugar.
 |
| I was featured! Thank you, Miz Helen! |
I am sharing this with these lovely parties:
 |
| I was featured! Thank you, Linda! |
Monday, February 4, 2019
White Chocolate Raspberry Bundt Cake

Oh my, do I ever have a treat for you today! Have you ever tried Nothing Bundt Cake's White Chocolate Raspberry cake? It is my favorite flavor! Last year my bloggy buddy, Jenna, from The Painted Apron made a version, and I have been dreaming about it ever since. You can see Jenna's cake here. Jenna is such a great cook and a wonderful artist. I actually made the cake for our ladies luncheon that we have every month, and it was a hit.

Here's the cake ready to bake in my pretty NordicWare Heart Bundt pan.

Look at the inside of the cake...heaven, I tell you!
Yield: 1 large bundt

White Chocolate Raspberry Bundt Cake
This cake is so heavenly if you love raspberries!
ingredients:
- 1 pkg. white cake mix
- 1 pkg. (4-serving size) instant white chocolate pudding (Hershey makes one) or instant vanilla pudding
- 1 c. sour cream
- 4 large eggs
- 1/2 c. water
- 1/2 c. oil
- 1 1/2 c. white chocolate chips chopped into smaller pieces (I chopped mine in the food processor after freezing them for a bit)
- 1 c. raspberry pie filling, pastry filling, or even raspberry jam
- 4 ounces cream cheese, softened
- 1/4 c. butter, softened
- 2 and 1/2 cups powdered sugar
- 1t. vanilla
instructions:
- Grease and flour a bundt pan (I like to use Baker's Joy to get in all the crevices), and preheat your oven to 350 degrees. Mix first six ingredients together with a beater. Fold in white chocolate chips.
- Fill prepared bundt pan with half of the batter. Spoon half of the raspberry filling in small, separated spoonfuls over the batter, and swirl.
- Pour remaining batter in evenly and spoon in remaining pie filling, repeating the swirling process.
- Cook in oven at 350 degrees for 45-50 mins, or until a knife inserted comes out clean.
- Remove from oven. Let cool for 20 mins. Remove from pan, and let cool on a cooling rack. This will take awhile to completely cool.
- In a medium bowl, cream together the cream cheese and butter until creamy. Mix in the vanilla, then gradually beat in the powdered sugar, starting with 2 cups, then add the other 1/2 cup, until it is thick.
- Frost the cake (See note).
NOTES:
To get the ribbon effect of the frosting, use a piping bag OR fill a gallon food safe bag with the cream cheese frosting, and twist the top. Cut a corner off of the bag, and squeeze the icing onto the cake.
What to do with the extra pie filling? You can make a half recipe of these Raspberry Crumble Bars.
Created using The Recipes Generator

My bloggy buddy, Lauren, at My Wonderfully Made Blog recently made the cutest chenille Valentine decorations, and Cissy and I made them from Lauren's inspiration. They were such fun to make. You can check out Lauren's darling ones and her valentine tree by checking here.

My version is here. Cissy gathered the tulle with needle and thread and she fashioned the hearts to surprise me out of some of the bump chenille.
Thank you for your visit! xo
I am sharing this with these lovely parties:
Monday, November 26, 2018
Old Fashioned Gingerbread

If you love moist, spicy gingerbread cake, please join me for a slice at the children's table! My friend, Sarah, over at Hyacinth For The Soul graciously let me share the recipe, and Oh My, is it ever a great one!! I have loved gingerbread since I was a little girl, have tried several recipes, and now finally found THE ONE!! I used my Snowy Village cakelet bundt pan to start out the Christmas season. I made the Big Star quilt years ago to complement my dishes from Target ( when Target was called Gold Circle) that are probably over 30 years old.

My Lady Catherine's Tea Room was found on a shopping trip with my beloved Mom years ago, too. My "real" name is Catherine, and Cissy is named after me. I'll be giving this cottage to her one day.

We are going to be sipping some Comfort and Joy tea, by the Republic of Tea, which is a new favorite of mine.
Yield: This recipe makes 7 cakelets, 4 mini bundt cakes, and 1 mini loaf, or a 9 x 11" cake

Old Fashioned Gingerbread
ingredients:
1 cup butter, softened
1 cup sugar
2 eggs, well beaten
2 cups flour
1 tsp cinnamon
1 tsp ground cloves
1tsp ground ginger
1 cup dark molasses
1 tsp soda
1 cup boiling water
instructions:
Cream butter and sugar.
Add eggs,
flour, cinnamon, cloves, ginger and molasses. Mix thoroughly. Dissolve
soda in boiling water and add to batter. Mix well. Pour into greased
9"x11" pan and bake at 375 for about 30 minutes. When cool, dust with
powdered sugar.
NOTES:
The recipe calls for a 9"x11" pan to bake the gingerbread and serve it as a piece of cake. To adapt the recipe to bake in the snowy village cakelet pan, I used Baker's Joy and sprayed the molds, filled each cakelet about 2/3 full, and baked till a toothpick came out clean, about 20-25 minutes. Let cool for about 15 minutes before removing from the pan.

Before Thanksgiving, I was able to have my granddaughters, Cissy, Ella, and Avery over to have some kitchen fun! We made the turkey gobble cupcakes that Mary had shown us how to do, from Home Is Where The Boat Is. The girls did such a good job and kept thanking me. They're so sweet!
I am sharing this with these lovely parties:
Tuesday Cuppa Tea
Tuesday Cuppa Tea
Subscribe to:
Posts (Atom)
